Working with the Alpha Channel in Seashore
On a separate page, I mention Seashore as a free bitmap drawing and manipulation program, based on the Gimp. This page was written at a time when there wasn't much easily accessible documentation for Seashore (there now is a user guide available for download at the project web site). The focus is on handling transparency.
Seashore has lain dormant for a while but is still under development as of November 2010, with a user interface that is much simpler and more Mac-like than that of Gimp.
Here are two approaches that work in Seashore:
Letting the image be its own mask
The manual procedure outlined here is just the bare minimum needed for creating a transparent background. To be more sophisticated, is up to you. In Seashore, we want to make the background of the following image transparent:
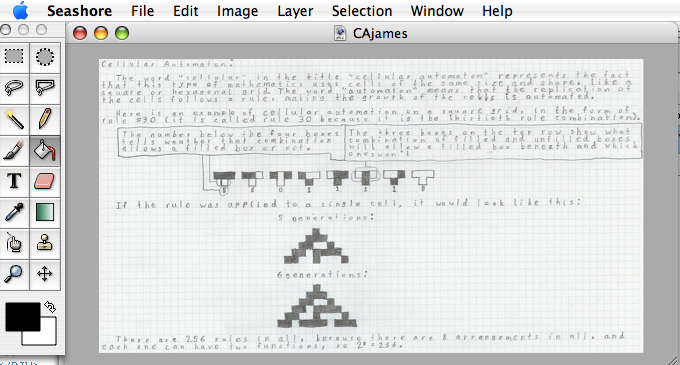
This isn't so easy because my son created it in pencil on grid paper, and since it's been scanned in the background isn't completely white. He tried to write like a computer here, which is fitting for this example. The general idea is as follows:
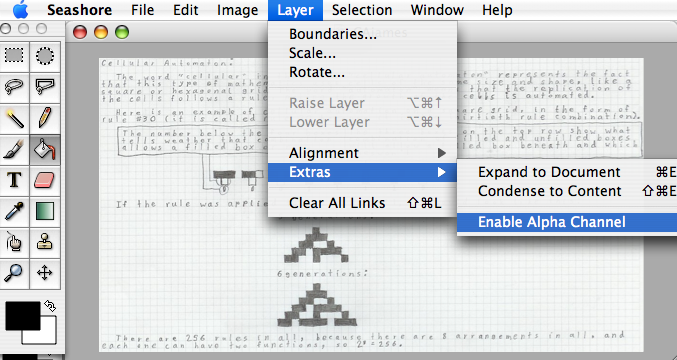
- Make sure transparency (the "Alpha Channel") is enabled in your picture, as shown in the screenshot:
- Choose Select all from the menu and copy the image.
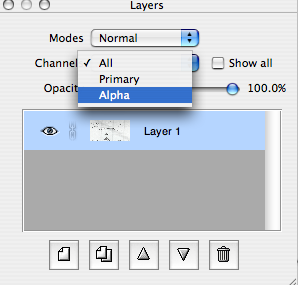
- With the image copied to the clipboard, go to the Layers palette and set it to display only the Alpha Channel:
- Paste the image. It will be in a "floating layer" for now. You could anchor it to the Alpha channel now, but we'll do that later.
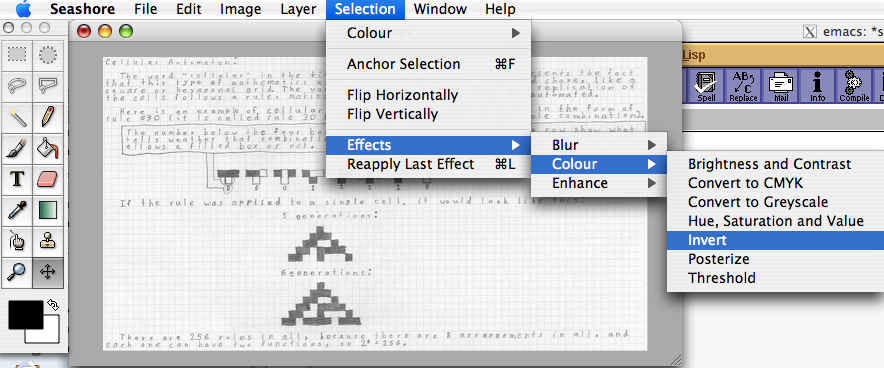
- The image that will determine the transparency in the Alpha channel should be black wherever the picture is to be transparent. So we simply invert the colors in this example, since our grid paper happens to be white:
The result looks like this:
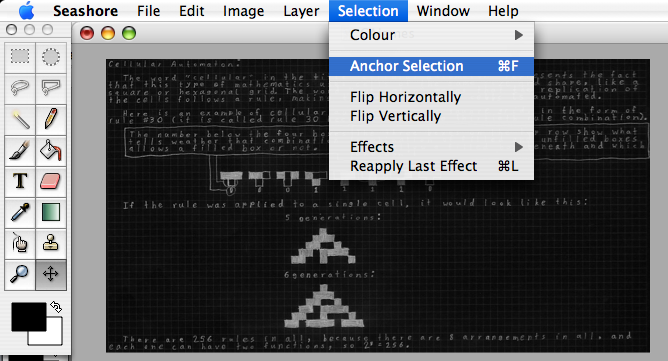
- Now we anchor the floating selection with our inverted image to the Alpha Channel:
If you set the Layers selector to display "All" again, the image should look pretty much like the original we started with, because the presence of the Alpha Channel is only noticeable if we now put the image onto a different background (the background color should shine through). To verify this, the final result can now be exported as .png, one of the common formats that support transparency. Don't use .gif, it seems Seashore doesn't handle GIF transparency correctly.
Just for fun, here is another example obtained with a similar procedure:
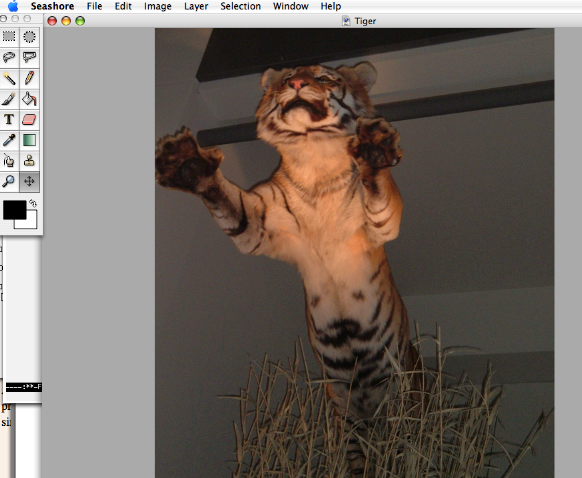
With this tiger, I needed to convert a copy to grayscale first,
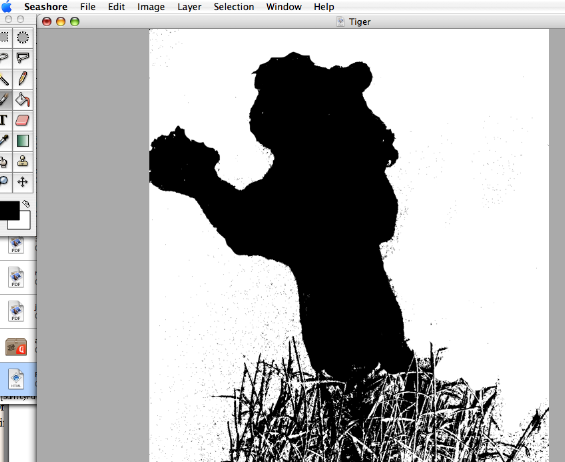
I cleaned up the background with a few paintbruch strokes, adjusted brightness, contrast and threshold to make the tiger black, and then inverted this before putting it into the Alpha channel:
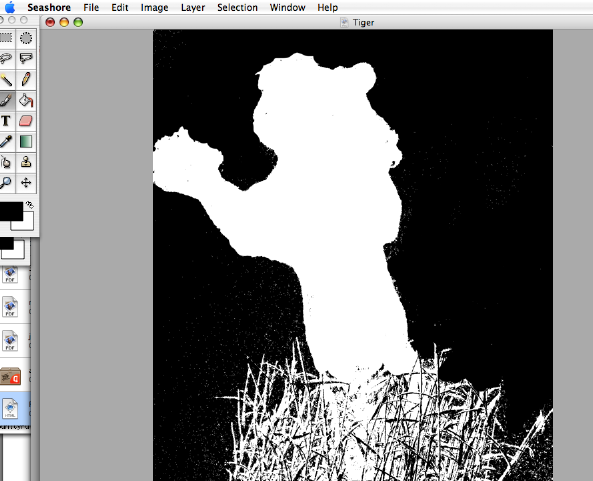
The result is a tiger without background:

In conclusion, we can do what Keynote '08 can do. The advantage is that we can now do with the image what we want: paste it into Keynote, or put it in a web page, etc.
Cutting out pieces
Beyond the above example, the main idea in getting transparency to work is always: create an Alpha Channel and provide it with a grayscale image that is black wherever you want the background to shine through. This can be achieved in many ways, depending on the image under consideration. For example, in some cases it can be advantageous to simply use the lasso tool to cut out part of your image, paste it into a new graphic and work with that. With that approach, you may end up with the simpler problem of making a homogeneous, background region transparent.Even if the background isn't completely homogeneous, we can make it transparent using the "color selection tool" (or magic wand) in the tool bar. It selects regions with the color you click on, within a tolerance you specify in the "options" utility window. To select regions that are not connected, you can check the "Add" mode in that same options palette.
When all desired regions are selected, copy them and paste them as a float above the alpha layer. Now manipulate the colors so that the selected regions become black (using items from "Selection>Effects>...") . Anchor this to the Alpha layer, and the result should have the transparent background when saved as PNG.
The Window menu item "Utility Window > Transparent Color" lets you choose a color that is displayed as background wherever the image has transparency. This window should therefore more properly be called "Custom Background Color", it won't be visible outside of Seashore once you save the image. For example, in the above tiger picture, if I choose red as the "transparent color", all that happens is that the parts shown as white in the background will be colored red.
Seashore is something like a "light" version of the Gimp, so if you want more features and documentation, you should look at that program instead. Here is a link that may help go further with the topic at hand.
noeckel@uoregon.edu Last modified: Tue Jul 12 11:09:21 PDT 2011