Using Mac OS 10.4 Tiger with X11 and fink
Set up the Mac OS X environment
Tiger (Mac OS X version 10.4.x) is assumed here. For old notes pertaining to pre-Tiger Mac OS X, see here. This also contains discussion of specific software I consider useful.
The starting point for these notes is a G4, G5 or Intel Mac on which you have just upgraded from the Panther operating system to Tiger. This page is not about how useful the new features of Tiger are; there are more than enough pages like that out there - if you're looking for general praise and criticism of features in OS X, look at some of my other pages. This page addresses the question of how to get X11 and other UNIX software running under Tiger.
The Terminal application is the place where practically
everything happens that you see described here.
The typical setup for a new computer is that you'll have created your
acount in the directory /Users, and your permissions will
not allow you to arbitrarily write to directories such
as /usr/local (these are also hidden from the
Finder). These kinds of operations require administrator
privileges. Of course, the original user account on a new Mac is also
an administrator, but to invoke that power you'll need to precede a
command by sudo. Try this with a harmless command
like sudo ls, and you'll be prompted for the
administrative password that you also use to start installations under
Mac OS X.
Installing things is tempting, and disk space is quite abundant on new Macs. But you should decide carefully which of the items I list below you really need. There's no need to worry that installed software slows down the computer; but the more you have installed, the more there is the potential that conflicts arise when you try to update some or all of your software. There are some software packages for Mac OS X that create problems of this sort, too, so this caveat is not platform-specific. One thing I noticed some time ago is that Norton Antivirus software slows down the system ever so slightly (but that can add up...). There are alternatives that you can get from the open-source community.
The Terminal is very powerful. Do not use root privileges unless
you absolutely need to. The command for this
is sudo. Essentially one can take complete control of
the system using this interface. As a first example of what's
possible, try the command system_profiler -detailLevel
-2.
All this power is especially useful if you want to manipulate your Mac
through some remote connection; in that case the command line is your
door into the computer, and if you have an administrator account it's
essentially as if you're sitting in front of the computer. Even the
installation of regular Mac OS X Applications can in principle be
performed purely within a terminal. I.e., you can mount disk images
(.dmg files) and run the installer purely from the
command line. The commands for this are hdiutil attach
and installer -pkg.
Survival tips
The following are basic things that I learned almost twenty years ago, but if you're new to UNIX then not knowing little details like this can be a real obstacle:
-
Apple's Terminal Application has some nice information and links built right into its
Helpmenu. For example, search for the term "permissions" or "high-bit characters" in the Help browser. -
To find out more about terminal commands, one uses their
man-pages. This is done by typing, in the above examples,
man
      system_profiler
, and similarlyman hdiutilandman installer.. To read a man page and also be able to search it, you can useemacsor xemacs. I mention this because I use both of these constantly - including right now. Launch the editor and press ESC-x, then typeman, followed by RETURN and the name of the command whose manpage you want to open. To find out more, doman man. To get an idea of the scope of the command-line world, you can browse a beautified collection of man pages at the Huntsville Macintosh Users Group web site. -
Not only does UNIX have a system of manual pages, it also provides a
stone-age version of a "Spotlight™" search: if you
want information related to a topic but can't recall the command to
look up in the man-pages, use
apropos. For example, typeapropos fontto see what commands are available that have to do in one way or another with fonts on your machine. This will save you many a fruitless internet search. To invokeaproposfrom within xemacs for easy searchability, do the following: Say you want more information about your system in general. Then in xemacs, typeESC-x tshellto start a terminal emulation, thenapropos system | cat. The vertical bar sends the apropos output to thecatcommand which lists the tex without pausing for pages. Now you have the output stream in your xemacs buffer which can be searched, copied etc. The same can of course be done in the Terminal application if you're not using xemacs. -
Unfortunately, not all installed commands have man pages, even if they are pre-installed. An example is the
screencapturecommand. Tiger does provide a man page, but Panther doesn't. If you know the command name but can't get a man page, try calling the command with the option--help. Even if this option isn't recognized, you may at least elicit a response giving you the correct usage options. For more on screen shots, see the hints for creating presentations. - If you have Apple's XCode Development environment installed as described below, there is another appealing way to look up information: Go to the Help menu of XCode and look up a man page directly from there. The information is formatted very nicely, including sectioning hyperlinks.
-
There are other help systems in UNIX, e.g. the command
info: it opens something like a UNIX textbook, sorted into sections. For TeX-specifics, there is alsotexdoc. Xemacs has its own extensive documentation underM-x info. -
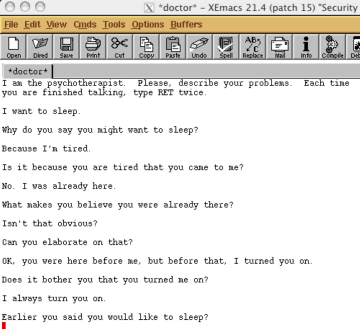
Last but not least, psychological help is always available. As with
man, this is best accessed from xemacs by typing ESC-x followed bydoctor. Here is a typical screenshot of a help session:
Install XCode 2.4
XCode is a development environment that provides (among many other things) the C++ compiler that will be used below to compile most of the open-source software that is available for the Mac. This package may be on the Tiger Installation CD. However, to get the most up-to-date version, it's best to check the Apple website, and check for XCode under "Tools". There are also additional compilers available for download as "XCode Legacy Tools". These encompass older versions of gcc which may be needed to compile some older software. The optional installation of these tools also includes various SDKs that are needed for compiling applications later on. Having the latest version of XCode is probably the main reason why it is worth switching to Tiger (most other features, except Spotlight, are "gimmicks").
Install Apple X11
This is the XWindows server which you need in order to run things like
Xemacs/emacs etc. It is also included on the Tiger installation CD, but does not get installed automatically with Tiger. The version number of X11 on Tiger is 1.2. As of November 1, 2006, the X11 application is available for download from Apple's website. On the Tiger installation CD, X11.app is found among the Optional Installs. You can activate those either during the Tiger installation or afterwards. Once installed, the newest version of X11 is available through Appple's Software Update.
Basic X11 functionality
Once you have X11 installed, the Mac is ready to be used as an X-Window terminal. So you can now connect to a remote UNIX host and run applications such as emacs, xv, netscape, gimp, mathematica, or whatever is installed on that host. In order to do that, however, you have to establish a connection that tells the remote host (named host, for example) to use your screen as the display. To do this automatically, you use the secure shell command:
ssh -Y username@host.
Here, username is your account name on the host machine. Note the -Y here. On earlier versions of Mac OS X (including Panther), there is a different version of ssh which needed the argument ssh -X instead.
To test the remote connection, try to open an X-window terminal by typing xterm in the ssh session. If this works, you're all set. If there is an error message
Xlib: No protocol specifiedthen type the following in a Mac Terminal window:
defaults write ~/Library/Preferences/com.apple.X11 nolisten_tcp -boolean false
which modifies one of X11's default settings. To understand this command better, read the following brief explanation.
Changing application defaults
There are different mechanisms to change default behavior of programs on your Mac:
- Darwin shell programs
-
The command-line programs that you will be running under X11 (or in the Terminal) are affected by environment variables, some of which are set in initialization files (or directories) starting with a dot in your home directory, e.g.,
.xinitrc(see below). - OS X Applications
-
X11 itself is an Application under OS X. As such, its properties are determined in a way similar to the old Classic Mac's Preferences, residing in the user's
~/Library/Preferencesdirectory. Thoseplists(property lists) are sort of a replacement for shell environment variables. To see the contents of these preference files, use the commanddefaults. Its man page explains this in more detail - for example, you can trydefault readto see the contents of a .plist file. The keywords in there are the "environment variables", and some of them may in fact be changed from some interactive menu in the respective application, but some are "hidden" to the average user of the application (like advanced preferences). In different versions of Apple's X11, there were different preference buttons available to modify these settings. But it's perfectly legal for a user to change them usingdefaults write(that's why it doesn't require administrator privileges). We'll make use of this mechanism right away.
Applications create X11-windows with a variety of different behaviors. Some don't respond to clicks properly unless you customize X11 slightly. I use the following setup:
- In the x11 input preferences, select only "Emulate three-button mouse" and disable the other options.
-
In Terminal, type
defaults write com.apple.x11 wm_click_through -bool true. This modifies a file called ~/Library/Preferences/com.apple.x11.plist. You can check its contents withdefaults read com.apple.x11, but beware: the output values are listed as "1" or "0", but one cannot enter these values as numbers (Martin Costabel found this out in response to a problem I had with the imagemagickdisplayutility where menu windows never responded to clicks). That's why I used "true" above, and you need to use "false" to disable this again. - To be able to use all the Mac's fonts under X11, they have to be converted to an appropriate format and moved into the X11 directory. There is a fink package
applesystemfonts(see below for more on fink) that does this for you. It allows me, for example, to run xemacs with fonts such as Andale Mondo. To make sure that the fonts are seen by X11, one has to tell the X11 system about fink's paths. This is done by including the line
. /sw/bin/init.sh
near the top of the X11 startup file.xinitrc. -
There is a system version of this file called
/etc/X11/xinit/xinitrc, and you should copy this file to~/.xinitrcin order to make modifications to it. This is especially useful to do if you want to try out different window managers, endowing the X11 windows with different visual and functional properties. As an example, one may replace the last line in the file~/.xinitrcby something likequartz-wm --only-proxy& exec /sw/bin/sawfish
instead of the defaultexec quartz-wm. quartz-wm is a window manager that is specially designed to integrate well with the Aqua desktop, including the ability to copy and paste using menus at the top of the screen. In the modified version, I instead run the sawfish window manager but also activatequartz-wm --only-proxyin order to keep its copy-and-paste functionality.
While quartz-wm is built into Apple's X11, sawfish is not; so how to get it? The next step is to enable your Mac to become more than just a terminal, and actually run X-Window programs without the help of a remote host. It's getting more and more straightforward to get the X-Window software you need for the Mac. A simple way is to use a package distribution system such as fink, which is described next.
Get the Fink porting software
This allows you to download all the UNIX applications you'll ever need. Since this porting system is still transitioning to Tiger, it is best to work your way through to the most up-to-date installation instructions by starting from the entry page http://fink.sourceforge.net/ There are different instructions on that page, depending on whether you are a new fink user or have used fink before upgrading to Tiger. Make sure you follow the appropriate link!
In the configuration process, I would suggest choosing the option that makes fink download pre-built binaries whenever they are available. This saves a lot of compilation time. Also, before going through the final configuration steps, make sure you know what command-line shell you want to be running; see the following section.
If you are new to fink, it may be useful to use a graphical user interface rather than the command-line version which I am using. The GUI, called Fink Commander, is available from http://finkcommander.sourceforge.net/.
Login shell and initialization script
On the Macs that are sold nowadays, the default login shell that takes your command-line instructions in the Terminal is called bash. On the other hand, the fink installation instructions in several places seem to assume that you are using a different shell, called csh. I personally am running a relative of the latter, tcsh, and fink's instructions work fine for that shell.
Of course you can use fink with any shell you like, provided you run the correct version of fink's initialization script. If you keep Apple's default setting, the bash shell, you just should avoid trying to execute scripts that have .csh as their suffix. Specifically, I am talking about the initialization script, see below.
I changed the shell setting from bash to tcsh using the application
/Applications/Utilities/Netinfo Manager. Under
"users", look for your login name and check the list of
properties for your account. There is an item "shell",
which I modified to /bin/tcsh.
This choice of shell is mostly a matter of taste, but also of
historical compatibility with earlier versions of
OS X. In OS X before Panther, tcsh was the default. I
have switched back and forth between csh,
ksh and tcsh over the years, and I see no
reason to abandon tcsh again, having written a couple of important
scripts specifically using tcsh syntax.
The choice of shell having been settled, you will have to create an initialization file in your home directory. For the instructions, see the fink documentation. This FAQ is extremely valuable, it really answers a lot of questions you may come across, so make sure you get a general overview of it before embarking on the steps that follow.
Fink installations
The default setup for fink is to let you install only packages that are classified as stable. You can change this by following the instructions at the fink FAQ.
A first issue related directly to the Terminal is the use of color. Under Panther, I used the built-in ls command to get colored directory listings (ls -G). This also works on a recently bought computer where Tiger was installed in pristine condition. However, on a machine that was upgraded from Panther to Tiger, I found I needed to switch to fink's version of ls because the version in /bin didn't seem to respond to color options. All that needed to be done to fix this was fink install fileutils. The result is the command ls (located now in /sw/bin) now accepts an argument --color=auto. The following line in you .tcshrc file enables this feature whenever it makes sense:
alias ls /sw/bin/ls --color=auto
For some more graphics software from fink, have a look at my discussion of vector and bitmap graphics for scientific illustrations.
Integrating X11 with Aqua
To launch X11 programs, one usually types their name from a Terminal command line, e.g., xemacs& (where the ampersand launches the application as a job and immediately returns control to the command line). Instead of this, one can easily wrap this execution shell statement in an AppleScript or other Mac-native interface, and thus create a double-clickable application using the shell executable.
The easiest and in most cases best way to do this is to download the XDroplets Tool. For example, an X11 application that can come in handy is a DVI viewer, in order to display documents created using LaTeX. There are several Mac-native approaches to this issue, but they almost all work by converting to PDF first, and this adds some processing time. Also, sometimes you may want the additional features provided by xdvik, the X-window dvi viewer (e.g., its search function is quite fast). There's xdvi and xdvik. I have xdvi aliased to xdvik because its interface is nicer. Here are the steps to create a dvi viewer for OS X (there is a shareware DVI viewer that doesn't require X11, but if you know you'll be using X11 a lot anyway, then I suggest this free alternative):
-
Make sure you have installed
tetexfrom fink (or obtain xdvik from somewhere else), so that in a Terminal window you can launch a DVI viewer by typingxdvik. - Launch the "XDroplets Factory"
-
Enter
xdvikas the name of the command - Press return until all fields are filled with their default values
-
You're done; an application called
Xdvikwill appear in your Applications folder. Now you can open dvi files withXdvikby choosing it in the file's contextual menu or using drag-and-drop. The script will automatically launch X11 if it isn't already running. - If you don't want to do this yourself, here is the final product as a downloadable application: Xdvik.zip. I keep it in the Utilities folder.
Jens Nöckel Last modified: Wed Dec 31 15:51:01 PST 2008