by JOHN PARK
| TUTORIAL 01: INTRODUCTION | ||
Starting from scratch in Flash CS4 |
||
| STEP 1: New Document, AS 2.0, 20 FPS |
||
Let's create a new file and choose "Flash File (Actionscript 2.0)". Using the slightly older Actionscript 2.0 programming language is easier to learn (and to teach) compared to the newer and more advanced Actionscript 3.0 version. Here is your blank scene. Before you begin, you should know that just about everything in your Flash file can be customized, including the SIZE of the stage (this is important because it determines the scale of your movie in a web browser), the SPEED at which it plays (called FPS or Frames per Second), and the BACKGROUND COLOR of the Stage.
We will keep the stage size the default size (550x400 pixels), but let's change the Frame Rate to 20. This will make animation look smoother because it will play your frames at a faster rate. If you want to change the Background Color, feel free to do so by clicking on the little box next to 'Background'. |
||
| Step 2: The Plan | movie clip + button |
||
The purpose of this tutorial is to teach you how to make a movie clip that has an animation in it, and to trigger that movie clip with a button. Let's make the movie clip first. But before we begin, it is important that you understand that there are 3 main classes of objects in Flash. Just about anything you make within, or import into Flash can turned into one of these three types of objects. The three classes are: • GRAPHICs • BUTTONs • MOVIE CLIPs Graphic: you will convert all imported pictures into graphics, as well as most vector shapes that you want to animate. By converting something visual into a graphic, it allows Flash to work with it more efficiently PLUS it gives you extra controls over the item's properties, such as opacity, tint, etc. Button: allows user to trigger an event (such as a movie clip playing, a sound to play, etc). Anything can be converted to a button, including pictures, shapes, you can even have invisible buttons that only have hotspots (more on this later). Movie Clip: the most powerful of the classes. The movie clip has it's own TIMELINE (similar to the one on the main stage of your Flash file). It is flexible, reusable, and easy to modify. A movie clip can contain graphics, buttons, and (most importantly) more movie clips. This is what's called "nesting". More on this later. OUR FIRST MOVIE CLIP: |
||
Step 3: Add a circle, convert |
||
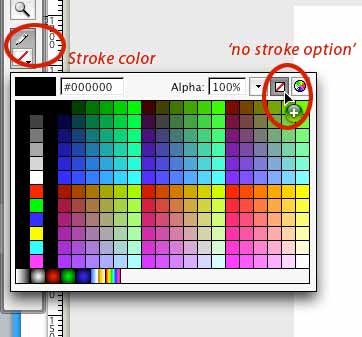
Let's add a circle to the stage. In the toolbar you can add shape by going to the 'Rectangle Tool'. If you hold down the button you will see other shapes, including an OVAL. I will use the oval, but you can use whatever you want. Before we add the shape to the stage, note that shapes can have both a STROKE (outline shape) and a FILL. I want to have ONLY A FILL and no stroke just because it makes life easier. So I will X out the Stroke in the Stroke color picker (see image):
In the color below the Stroke (pencil icon) button, you can choose the Fill color (paint bucket icon).
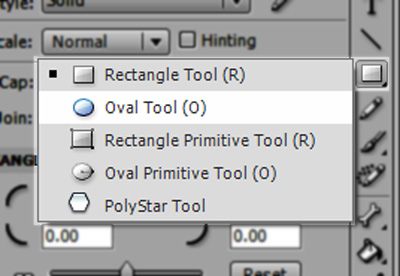
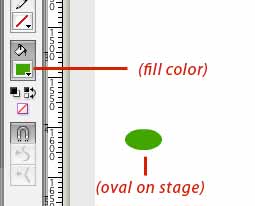
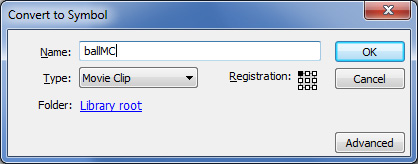
I will choose a green color for my fill and draw an OVAL on my stage. The oval shape (and a couple other shapes) are available in the toolbar. All of the buttons in the toolbar with the little black triangles at the bottom right contain a series of related buttons under them. Hold down the mouse over any of these triangled buttons to find more within. I wil do this under the RECTANGLE TOOL button to find the OVAL TOOL. Now draw an oval (or any other shape) on the stage. I know I want to make a MOVIE CLIP because a movie clip can animate, hold sounds, or do most anything else. The Movie Clip is the most flexible and useful of the three symbol types. So I want to convert this oval shape into a Movie Clip. The 'Convert to Symbol' function can be called with the F8 key, or in the file menu at the top go to MODIFY>CONVERT TO SYMBOL. Choose Movie Clip and give it a name. (note, when naming things in flash, don't use spaces or other special characters such as #,*,etc).
WARNING:
Be careful when clicking on items in Flash. If you DOUBLE CLICK on an item (such as a Movie Clip) you are taken
INSIDE of it and you see its timeline. This can be disorienting.
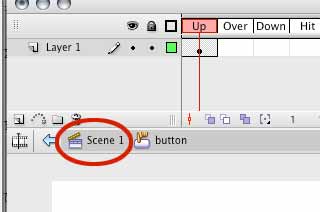
You can always return to the main stage by clicking on the Scene 1 button (see image). Because our green oval was a 'shape' initially, when we converted it to a movie clip, it actually only made a new movie clip and put that green oval in frame 1 of the MC. To see this, double click on the oval to go inside of the movie clip and see the shape inside is your original green oval.
|
||
Step 4: Keyframes, Tweens and Animation |
||
Before we animate anything we have to choose between a couple different methods of animation. Depending on which method we choose, the setup for the animation will be different. Here are the four different types to consider: MOTION TWEEN (best for moving, scaling and animating images or static drawings. High level of control over the path and speed of the animation) SHAPE TWEEN (best for animating the shapes of drawings made in Flash or Illustrator. Has a fluid/morphing quality to it. Does NOT work with imported images) CLASSIC TWEEN (this is more like the OLD Motion Tween from Flash CS3 and earlier. Use this option if you are used to Flash CS3 and like the old Motion Tween). CELL ANIMATION (Frame by frame, similar to traditional pre-digital hand drawn animation, each frame is a new drawing).
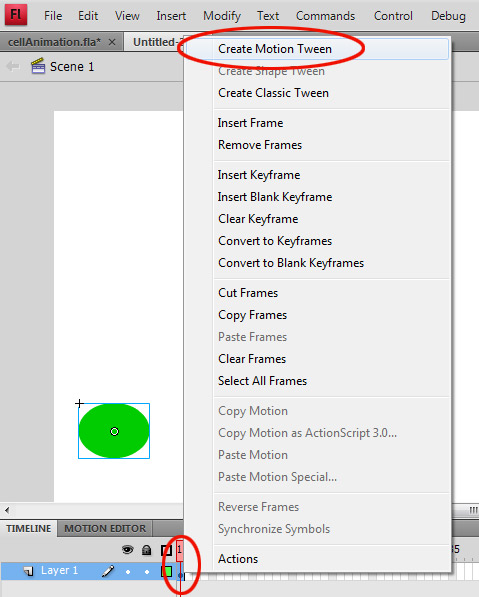
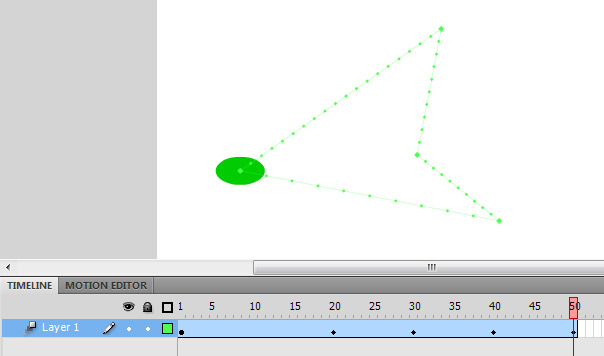
To animate anything we need to use keyframes. Simply put, keyframes are frames in time that mark where changes occur. So if I want my ball to move from from point A to point B, I would put my ball at point A and make that a keyframe, and then I would make another keyframe later in the timeline and put my ball at point B. How long it takes your ball to get from point A to point B is determined by how many frames (non keyframes) you put in between your keyframes. The great thing about Flash is that you can tell it to fill in the inbetween frames between the keyframe. (This is called Tweening). OK, let's do it. For this tutorial we will use Flash CS4's new Motion Tween method. If you have used an older version of flash in the past, pay special attention. By default my oval movie clip is on a keyframe in frame one. Keyframes are the black circles that are filled in. A close-up keyframe looks like this (see below image): To use the new Motion Tween method, we will start by RIGHT CLICKING on the black keyframe in frame 1 and choose "Create Motion Tween".
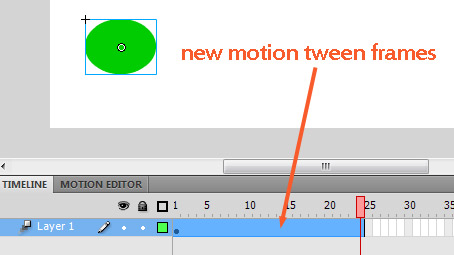
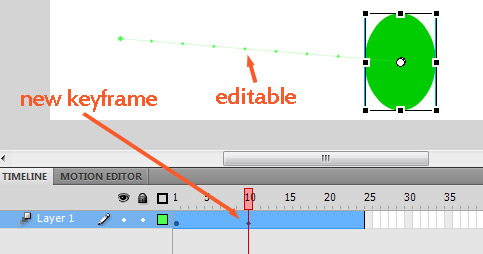
This will create a strip of transparent blue in the frame following the keyframe (see image below). The duration of the animation will default to one second long. So if you have your FrameRate (FPS) set to 20, then the blue strip will last 20 frames or one second. Everywhere in this new BLUE area of the timeline is a series of frames that are the same as the last keyframe (in frame one). BUT, with the new Motion Tween, flash is listening for changes to your MC. So go to frame 15, and move the shape, transform it if you like (Q key), etc. You will see a new little diamond in the blue area. This is a new Motion Tween keyframe (see below). The new green dotted path between the old and new position of the oval is an editable path. It can be edited with the Direct Selection key (the white arrow). There are two great new things about Flash CS4's new Motion Tween. One is the simplicity of editing the path between keyframes as mentioned above. The other great thing is the amount of control you have in changing movie clip properties by using the Motion Editor (if you want to jump ahead, google Flash Motion Editor for lessons). If you want to extend the animation length (the blue area in the timeline), click on a frame further down the timeline, say frame 50, and RIGHT CLICK to choose INSERT FRAME. Now you can make as many keyframe events by simple making changes to the oval.
Save your file.
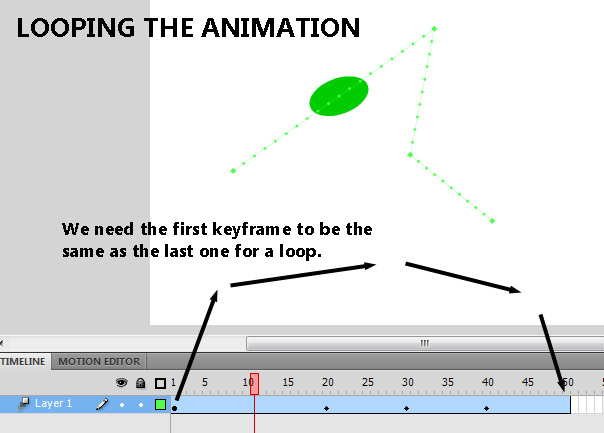
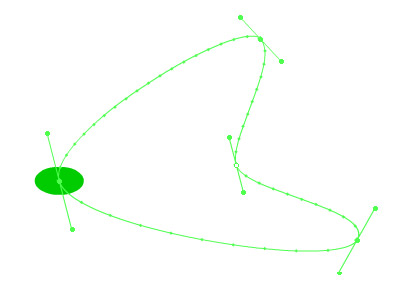
Let's make a smooth loop. To make the animation smoothly loop we need the first keyframe to be the same as the last keyframe. Currently in my animation I have 4 keyframes, but I need a fifth one that will bring the path of my oval back to its starting point. See below: After copying the first keyframe to the end position of the blue animation strip, then the green dotted path will also close off to be a closed polygon. Note that if you click on the keyframe in frame one of the timeline, the whole animation is selected, blue strip and all. We ONLY want the first keyframe so we can copy it to be the last keyframe. To do this, hold down the CTRL key, then click on the keyframe in frame one. Notice how ONLY that keyframe is now selected. You cannot use CTRL+C and CTRL+V to copy and paste frames because it instead copies the items on the stage.) So instead, with the single keyframe still selected, hold down ALT (OPTION key on a mac) and click and drag the first keyframe. This will make a copy and let you drag that copy to a new position. Drop it at the end of the blue strip and you should get something like this:
Now test the movie (CTLR+ENTER) and see if it seamlessly loops. Using these methods alone you could create some good animations. Here are a couple of things to note: 1) You can only have ONE OBJECT animating PER LAYER (THIS is where the new layer button is located) One more important note about editing the green dotted path of the motion tween. To move the points around, you can use the Direct Selection tool (the white arrow). To change the type of points from sharp corner points to rounded bezier points, you can hold down the ALT key and drag a point (still with the direct selection tool) and the corner point will smooth out and give you handles. With a couple clicks I got my angled motion path to look smooth like this:
|
||
Step 5: Adding a little actionscript |
||
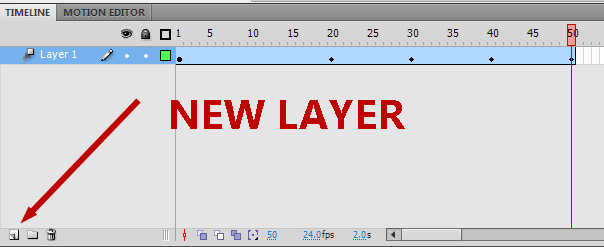
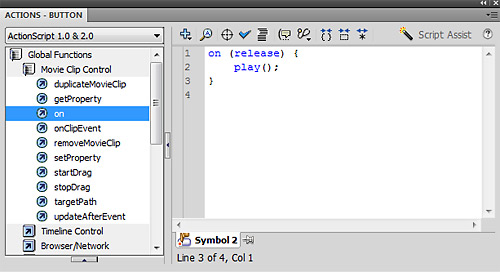
Actionscript allows you to do a LOT MORE in flash by using lines of code in your movie. For example, the first thing we will do is to add a little script to tell the movie clip to stop playing after it runs once. To do that, let's create a new layer for actions. Create a new layer here: You can double click on the layer names to rename them. I will call the initial layer ANIMATION and the other ACTIONS. Go to the last frame of movement in the ANIMATION layer and then click at that frame numer in the ACTIONS layer (ie, if your animation is 55 frames long, click on frame 55 of the ACTIONS layer). Hit the F6 key to make a new blank keyframe (or RIGHT CLICK on that frame in the timeline and choose 'INSTERT BLANK KEYFRAME'. You should now have something like this: We will now put the little stop(); actionscript line in the new blank keyframe that we just made in the ACTIONs layer. NOTE: to add actionscript in Flash, you must add it to a keyfame, not just any frame in the timeline. Select that new blank keyframe and then pull up the Actions Window. There are a couple ways to do this. The fastest is F9 (unless this key is being used by something else. In OSX, it's ALT+F9). Another way is to go to the WINDOWS>ACTIONS. We want to add what is called a 'STOP' command. Once again, there are multiple ways to get there. The fastest is to type in the window: Another way is to find stop through the presets column on the left side of the actions window. It is under GLOBAL FUNCTION>TIMELINE CONTROL>STOP (you can double click on it). See image: Now test your movie (CTRL+RETURN on PC, APPLE+RETURN on Mac). |
||
Step 6: Making a Button |
||
As we mentioned before, any object can be converted to a button. Let's make a square shape and turn it into a button. To do that, add New Layer button in the timeline and call that layer BUTTONS by double clicking on the layer name. This isn't necessary, but separating items to their own layers is helpful for organization. In the same way that we converted the previous oval to a graphic, convert this one to a button (F8 or MODIFY>CONVERT TO SYMBOL). Your shape is now a button. I made a red rectangle, converted it to a button (F8). To edit the button (you NEED to edit it), double click on the button. now you will see on your timeline that the button's timeline has 4 states (4 different named keyframes), UP,OVER, DOWN, HIT. This is what they do: UP: what the user sees all the time, unless they are hovering over the button HERE IS A FLASH EXAMPLE OF THE FOUR STATES: By default, there is only an UP state for your button. This is a problem because it means that there is no 'hotspot' for your button.The quickest and dirtiest way to get a button is to copy the first keyframe to all the other blank spaces. To do that select keyframe 1, and hit F6 3 times. If you want to change the color of the button for each state (if i want my red rectangle to turn blue when the user hovers over it), click on the corresponding keyframe, then select the button on the stage and make the color change in the Properties Inspector. Go back to your main scene. Now test your movie (CTRL + ENTER). If you made changes to each or any of the states of your button, they should show up here. |
||
Step 7: Adding ACTIONS to the button |
||
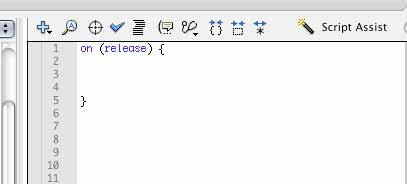
Now we want to attach some actionscript to the button. We will do this because, we want the button to trigger an event (eg, your movie clip to play) by clicking on the button. So THIS TIME when we add the actionscript we will select the button itself (instead of a frame in the timeline) and add actionscript to the button. Make sure you are on the main stage (and not INSIDE the button or another MC) and click once on the button to select it. Go into the Actions Panel (F9 or WINDOW>ACTION). Once again there are multiple ways to get what we want to add. If you prefer typing, this is what we want the script to say:
---------------------- An alternate way to get to the ON() command for the button is to click once in the actionscript text area and then hold down the ESC key while typing the letters ON. Assuming this works, you will get a little popup to ask you what event you want the ON command to happen, choose RELEASE (the release of the mouse button after clicking). This will give you the proper syntax for what we need. __________ Here is what's going on: Since there is a stop(); in the timeline, we want to tell flash to simply PLAY beyond that stop();
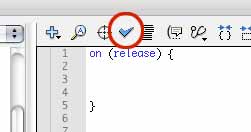
To test your syntax and have flash look for any errors, click on the check mark icon: Save and test your movie. If you kept your previous actionscript that was on the LAST KEYFRAME of the timeline, then your tween animation should play once, then stop. The make it play again, you SHOULD be able to click on your button and it will PLAY that MC (essentially overriding that STOP action, until it hits it again). |
||
Step 8: Freeze your animation UNTIL you start it |
||
Now let's make your animation completely stopped at the beginning and we won't allow it to start UNTIL your user clicks on your button. To do this, all we need to do is cut the Actionscript from the last keyframe of your movie and paste it into the first keyframe of the same movie clip. Once you've done that, you're good to go!
|