by JOHN PARK
| USING SOUND IN FLASH: |
Putting sound in Flash - (using button states) |
| STEP 1: Sound in a button |
One method to trigger sound in Flash is to insert the sound file directly into one of the four states of a BUTTON. If you need a refresher on buttons in Flash and the four states of a button, please view the buttons tutorial: HERE FILE DOWNLOAD (if you want to do this exercise yourself). This is our button without any sound attached. By now you should know how to create a button with four states. If not, please revisit the first tutorial here: tutorial
Now we will be using a sound clip of a wasp buzzing. When you use sound clips in Flash, keep the following things in mind:
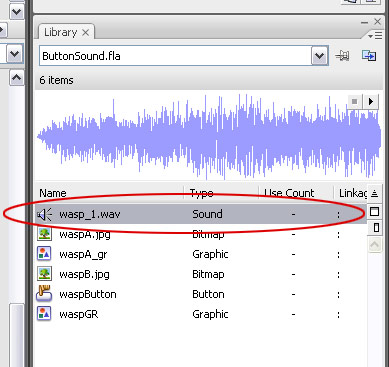
You can import a sound file in the same way that you would import a picutre into flash: either go to FILE>IMPORT>IMPORT TO LIBRARY, or hit CTRL+R, then choose your sound file. Mine in called "wasp_1.wav".
Now you should see your sound file in your library.
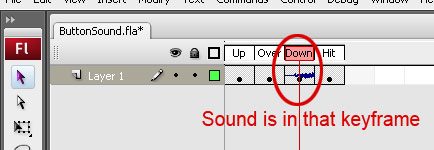
NOW is when you should decide how you want your sound file to be triggered. In this method, we will be inserting the sound file directly INSIDE our button (in one of the states), so our two main options would be for our sound to play when the mouse rolls over the button (sound would go in the OVER state), or if the sound plays when the user clicks on the button (sound would go in the DOWN state). Let's choose the latter. 1) Going into Button Editing Mode: To edit the four states of the button, double click on it in the stage. Now choose the DOWN state keyframe (see image): 2) Drag sound file from library to Stage: Now that we are in the right keyframe, we will go to the library and drag the wasp_1.wav file right ontp the stage (where the picture of the wasp is sitting). Once you do this, you will see that the DOWN keyframe in the timeline will have a new wiggly line running horizontally across it - this means that there is a sound file in that frame. 3) Test movie to see (hear) if it works: to test your movie hit CTRL+RETURN (or CONTROL>TEST MOVIE). Then click on the button (thereby activiatin the DOWN state). Here is the result:
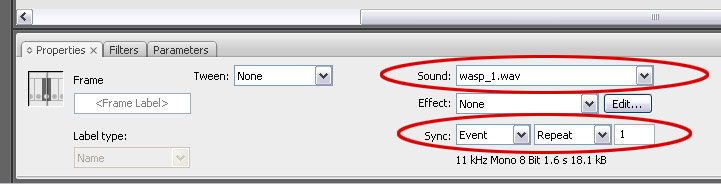
Making changes to the specific keyframe. Click once on the keyframe that contains the sound file, in our case the DOWN state of the wasp button, and look in the Properties Inspector. Here are the important parts:
Making changes to the whole Flash Movie. Now we will change the sound compression settings for when we export Flash.To do this, go to FILE>PUBLISH SETTINGS. This will bring up this dialog box: Click on the FLASH tab at the top to get the settings for the Flash movie (see top small red circle). To change teh compression levels for ALL of the sound files of the two Sync type (EVENT AND STREAM), click on the Set button for each. I knew that I was only using the EVENT type of sound in my movie, so I just changed that to 80 kbps (80 kilo bits per second - roughly hald CD quality sound). Chnage the quality/compression to whatever you see fit. If you have many sounds, keep in mind that the less compression (and higher quality) can mean longer download times for your viewer. Now click OK. That's it for adding a sound to a button state. Don't forget that if you put the sound file in the OVER keyframe instead of the DOWN keyframe, then you would hear the sound when the user hovers over the button. ALSO, note that you could have one sound in the OVER state, and a different sound in the DOWN state! Go crazy!
|
| ADVANCED IDEAS: |
IF you want to press the above concept further, think about the follwing ideas.
|