We covered a few new applications of SPSS in the second session. To assist in learning these tools, I suggest you work through the following exercises. You are not required to complete the exercises; however, you’ll need to understand basic analytical procedures to work with your project data set. Be sure you have your copy of the survey instrument handy—you’ll need it to interpret the variable names.
- Run SPSS
- Open the CoosBike.sav file in the SPSS editor
- Recoding Variables
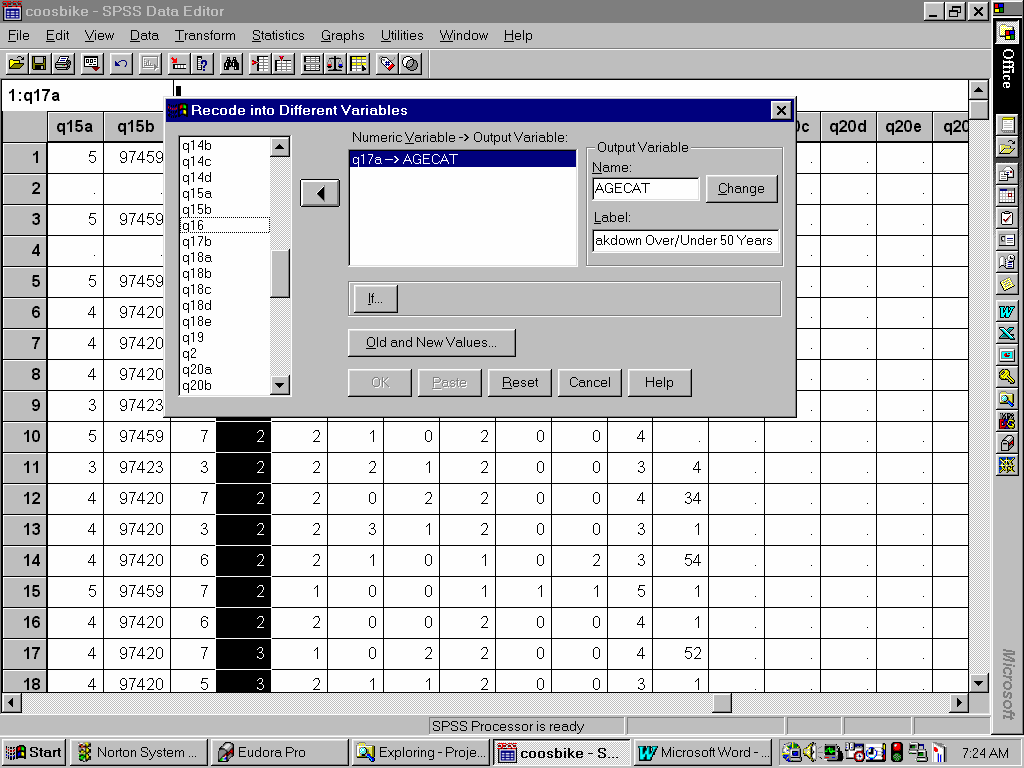
. First you will recode the age variable (Q17a) into two categories: respondents under 50, and respondents 50 or over. To do this, select Transform, then Recode from the main menu. You have two choices—you can transform the data into the same variable (e.g. the data in the Q17a column will be changed), or into different variables (e.g. SPSS will create a new column). In most instances you will want to transform into a new variable, thus retaining the original data. Select Into Different Variables.SPSS now displays a dialog box. First, select the variable that you want to recode (Q17a) and add it to the list of input variables. Next, provide the new variable (the output variable) a name—AGECAT—and a label—Age Breakdown Over/Under 50 Years. Now click on Change to add the new output variable.
The next step is to tell SPSS how to recode the variable; that is what values to assign to the data. In this instance we are collapsing seven age categories into two. A review of the initial data indicates that categories 1-4 are for respondents under age 50 and categories 5-7 are for respondents age 50 and over.
To recode the data, click the Old and New Values button. Note the dialog box is broken into two parts: old value and new value. Under the old value list click the Range option. Type 1 in the first box and 4 in the second box. Now click in the Value box under the new value list. This is the value you will reassign for the old values 1 through 4. Type in a 1. Now click the Add button in the old->new section.
Perform the same operation for the second set. Values 5-7 get assigned the value 2. When you’re finished, click on the Continue button. SPSS closes the Old/New dialog box. Click OK in the recode different variables box. SPSS creates a new column in the data editor called AGECAT.
- Adding Value Labels. Now that you’ve created your new variable, you need to define the value labels for it. When you recoded the variable in step 3, you created two values: 1—for respondents under 50; and 2—for respondents 50 and over. That provides a clue for what value labels you want to use.
To define the value labels, click anywhere in the AGECAT column, then select Data/Define Variable from the main menu. Now click on the Labels button. To add the labels, you need to know what values exist, and what they stand for. Since you’ve already determined this, you can define the labels.
Click in the Label box and type a 1. Now press the Tab key. Type in the Value Label: Under Age 50. Now click on Add to add the variable to the list. Repeat the process for the 50 and over category. Now click Continue to return to the Define Variable box. Click OK to return to the data editor and continue your analysis.
- Crosstabs Tables. We discussed contingency tables in class. The SPSS Crosstabs procedure will quickly create contingency tables for any pair of variables you select. You can further calculate measures of association such as Chi-Square if you desire. In this example we are going to compare the age (over and under 50) with level of education.
To initiate the crosstabs procedure, select Statistics, then Summarize from the main menu. Now select Crosstabs to display the crosstabs dialog box. Since we have already determined what we want to analyze, all we need to do is decide what goes in the columns and what goes in the rows. In SPSS this is not that big an issue—you can have SPSS calculate percentages by row or column or both in a crosstab table.
Select the variable Q19 (level of education) from the list and add it as the Row variable. Select AGECAT and add it as the Column variable. Now click the Cells button to tell SPSS what to display in each of the table’s cells. Select the Observed count option, and all of the Percentage options (row, column, total). Click on Continue to close the cells box, then click on OK to run the crosstab table. SPSS displays the results in the Output Navigator. I’ll leave the interpretation up to you.
- Sorting and splitting Your File. In some instances you’ll want to have the ability to analyze different components of your sample. Using the previous example, you may be interested in developing frequency distributions for each variable by age. You may have stratified your sample to include two distinct subsets that you want to analyze together and separately. You can do this by sorting the data and splitting the file on any variable.
In this example, you will sort and split the file by the AGECAT variable. To sort the data select Data/Sort Cases from the main menu. Now select the AGECAT variable and move it into the list of variables to sort. Now click OK to sort the variables.
Now you are ready to split the file. Basically this operation involves turning the split command on for the AGECAT variable. The split will remain in effect until you turn it off. To split the file, select Data/Split File from the main menu. Select the File is Already Sorted options. You have two options for output:
- Compare groups
—Split-file groups are presented together for comparison purposes. For pivot tables, a single pivot table is created, and each split-file variable can be moved between table dimensions. For charts, a separate chart is created for each split-file group, and the charts are displayed together in the Output Navigator.- Organize output by groups
—All results from each procedure are displayed separately for each split-file group.Select the Compare Groups option for this example. Now add the AGECAT variable to the Groups Based On: list. Click OK to turn the split on.
To see how the split works, run the frequencies procedure on the Variable Q1.
Reset the split to the Organize Output By Groups option and rerun the frequencies for Q1 to see the difference in how SPSS displays the output.
Turn the split off select Data/Split File then click Reset.
- Creating Graphs for "Select All That Apply" Questions. In some instances you may want to create a graph of data for questions the respondent could check more than one category. I usually use the percentage of respondents who check and then create the graph based on the percentages in Excel. You can create a graph of the number of respondents in SPSS using the Graph option. In this example you will create a bar chart of the responses to Q12.
To do this, select Graphs/Bar from the main menu. Select the Simple bar chart option, then select the Data in the Chart are: Summaries of Different Variables. Click Define. Now add Q12a through Q12h to the Bars Represent box. Note that SPSS wants to use the mean values. You want to show the sum. Click the Change Summary button and select the Sum of Values option. Now click Continue.
Next, click the Options button and select the Exclude Cases Variable by Variable option. Click Continue. Now click the Titles option and add an appropriate title. Click OK to render the graph.
Note that the graph editing capabilities in SPSS are limited in comparison to Excel.
- Getting Information About Your Data
. You can display the command file information about your data set, this is sometimes called the data dictionary. To do this, select Utilities/File Info from the main menu. SPSS displays the file information in the Output Navigator. Notice that not all the information can be displayed. You can open the file information in a separate window by selecting the data info and double clicking on it. Select the Open this item in its own Window option.
- Other Features
. A couple of things you might find useful:
- Utilities/Variables
—the Utilities/Variables command allows you to quickly get information on any variable in your data set.
- SPSS Command Syntax
—although you do not need to know the specific syntax to run most SPSS procedures, it can be useful to know. You can double click on the Notes option that displays with every event in the Output Navigator. This displays the specific command syntax that was used for the procedure.

[Home | Syllabus | Schedule | Assignments | Project | Links]
This page maintained by Bob Parker, ©2002
September 26, 2000