Plotting
![]()
Last Updated: 05/07/01 10:27 PM
Week 6
For review of simple printing, see Basic CAD review, Week 3, Simple Printing
For additional review, see Basic CAD review, Week 7
Much of the rest of this week's class notes are taken from AutoCAD's on-line help...
Controlling CAD Printout...
Following is a description of several scaling issues important to making your drawings come out of the printer as you expect...
Scaling Views and Linetypes (PSPACE)
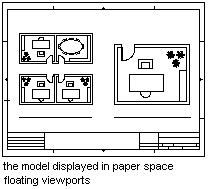
Each floating viewport contains a view of model space that you scale relative to your drawing sheet in paper space. In addition to setting the scale for each view, you also scale noncontinuous linetypes (linetypes with dashes) relative to your drawing sheet.
Scaling Views
The views in each viewport must be scaled to the same relative unit of measurement - paper space units.
For example, the illustration shows a paper space layout with several viewports, each set to a different scale and view.
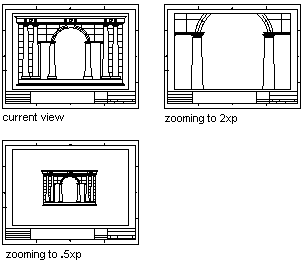
When you work in paper space, the scale factor represents a ratio between the size of the plotted drawing and the actual size of the model displayed in the viewports. Paper space is based on the size of the paper you specify; therefore, you generally use a one-to-one scale when you plot from paper space. To derive this scale, divide paper space units by model space units. For example, to plot your drawing at one fourth of the model space units, you specify a scale factor of one paper space unit to four model space units (1:4).
To scale views relative to paper space units, use the XP option of ZOOM. Unlike other ZOOM options, the scale factor you enter with xp is relative to the current paper space scale. As shown in the illustrations, if you enter a scale of 2xp, the scale in the viewport increases to twice the size of the paper space units. A scale of .5xp sets the scale to half the size of the paper space units, so the model is plotted at half its actual size.
If you need to edit your model, switch to tiled viewports by turning on Tile mode. Then, when you edit your drawing, you won't reset established scales if you zoom into or out of the model space views.
If you want to magnify part of your drawing without affecting the scale setting of a floating viewport, make sure you are in paper space before starting ZOOM.
Scaling Noncontinuous Linetypes in Paper Space
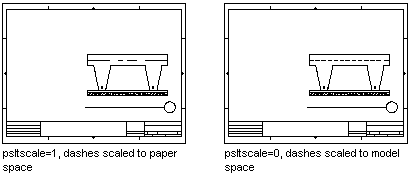
When you scale views in floating viewports, you sometimes create inconsistency in the appearance of dashed or dotted lines. For example, the line spacing in a dashed line is wider at a one-to-one scale than it is at a one-fourth scale. In paper space, you can base the linetype scale on one of the following:
The drawing units of the space in which the object was created (model or paper)
Paper Space Units
With the PSLTSCALE system variable turned on, you can maintain the same linetype scaling for objects displayed at different zoom scales in different floating viewports. With PSLTSCALE turned on, you can still control the dash lengths with LTSCALE and CELTSCALE. In the following illustration, the pattern of the linetypes in the drawing on the left has been scaled to be the same regardless of the scale of the view. In the drawing on the right, the scale of the linetypes matches the scale of each view.
The Plot/Print Window
Click on an area of the image above to read about it...
Device and Default Information
Displays the current plotting device and lets you select configured plotters, modify the settings of the currently configured plotter, and load or save PCP and PC2 files. Click Device and Default Selection to display the Device and Default Selection dialog box.
Note: You should also see the Printer tab in the Preferences dialog box for more information on configuring plotters.
Select a Device Configuration
Displays the manufacturer of the current device and the port to which it's connected.
The list box displays descriptions of all the configured plotters. AutoCAD LT uses the manufacturer's description when no description is entered during configuration. If you configured multiple plotters, select another one by picking the plotter description. Selecting another plotter can change the settings of other parameters in the plotting dialog boxes.
Configuration File
Saves or gets defaults from an ASCII plot configuration parameters (PCP) file or complete plot configuration (PC2) file. PCP files store device-independent information such as pen assignments, plot area, scale, paper size, and rotation. PC2 files store all the information found in a PCP file plus device-specific information that would otherwise be defined in aclt5.cfg; you can use PC2 files to batch plot to multiple plotters or printers using a script file or a 3rd party utility.
Save (Complete). Saves the current default settings to a PC2 file. AutoCAD LT displays the Save to File dialog box, in which you can save the defaults to a new or existing file.
Replace (Complete). Replaces the default settings with settings from a PC2 file. Current configuration information is lost unless it has been saved to a PC2 file.
To add a PC2 configuration to your list of configurations without replacing an existing configuration, select the PC2 file using the Open option on the Printer tab of the Preferences dialog box.
Save (Partial). Saves the current default settings to a PCP file. AutoCAD LT displays the Save PCP File dialog box, in which you can save the defaults to a new or existing file.
Merge (Partial). Retrieves the default settings from a PCP file. AutoCAD LT displays the Merge from PCP File dialog box, in which you can select a PCP file.
If the PCP file contains errors, AutoCAD LT displays a dialog box listing the errors.
Choose Create Error File to create a file containing any listed errors. AutoCAD LT creates a file using the PCP file name with an .err file extension. The file is placed in the same directory that contains the PCP file.
Additional Parameters
Specifies which rectangular area of the drawing will be plotted and how hidden lines and area fills will be handled. Also specifies plotting to a file.
View and Window are not available unless you have selected a view or defined a window, respectively.
When you specify any rectangular area option except View, AutoCAD LT applies the rectangular area to the current viewport and the current space, whether it's model space or paper space. AutoCAD LT creates the plot from the three-dimensional viewpoint most recently established in the current space.
A paper space plot includes all visible viewports and their contents. Viewports that have been turned off are not plotted. The MAXACTVP system variable, which sets a maximum for the number of viewports that can be active at one time, is ignored. If a viewport is on and within the plottable paper space view, it's plotted.
Display. Plots the view in the current viewport.
Extents. Plots the portion of the current space of the drawing that contains objects. This option is similar to ZOOM Extents.
Sometimes AutoCAD LT may regenerate the drawing to recaculate the extents before plotting.
If you plot the drawing's extents with a perspective view active and the camera position is within the drawing extents, AutoCAD LT proceeds as though you had used the Display option.
Limits. Plots the entire drawing area defined by the drawing limits. If the current viewpoint is not the plan view (viewpoint 0,0,1), AutoCAD LT proceeds as though you had used the Extents option.
View. Plots a view saved previously with the VIEW command. This option is not available until you select a view. Choose the View button to select a view from the View Name dialog box.
Window. Plots any portion of the drawing. Choose the Window button at the bottom of the screen to specify two corners of the area to be plotted.
Choose Pick and use the pointing device to designate the window if the whole area you want to specify is visible on the screen.
You can also specify the window by entering coordinates under First Corner and Other Corner.
Text Resolution. Sets the resolution, in dots per inch, of TrueType fonts while plotting, exporting with PSOUT, and rendering. Lower values decrease resolution and increase plotting speed. Higher values increase resolution and decrease plotting speed.
Text Fill. Controls the filling of TrueType fonts while plotting, exporting with PSOUT, and rendering. If Text Fill is not selected, text is output as outlines. The value for this entry is stored in the TEXTFILL system variable.
Hide-Lines. Plots model space views with hidden lines removed. When plotting from paper space, AutoCAD LT processes each viewport for hidden lines according to that viewport's Hideplot setting.
The Hideplot option of MVIEW does not affect plots made from model space. Hidden lines will be removed in a model space plot only if you select Hide Lines.
Adjust Area Fill. Adjusts the pen width for plotting wide polylines, and 2D solids. AutoCAD LT pulls the boundaries of the filled region inward one-half the pen width. Use this option to ensure the greatest possible precision.
This option is needed only in applications that require the plot to be accurate to half the pen width, such as printed circuit artwork.
Plot to File. Plots output to a file rather than directly to the plotter. The default plot file name is the drawing name with a .plt file extension.
To specify a name other than the default name, choose File Name. If the current drawing is unnamed, AutoCAD LT creates a plot file using the file name unnamed.plt. To specify an extension other than .plt, include the extension with the file name. For example, you can enter mpart.hp.
The plot commands for the currently configured plotter are sent to the named file.
For some plotters, the output format you choose determines whether the plot is written to a file and determines the file extension. Also, some plotters might not be able to plot to a file. For further information, refer to the plotter manufacturer's instructions.
Paper Size and Orientation
Specifies units for plot size, paper size, and orientation.
The orientation image file displays either landscape or portrait, depending on the configured device. If your current plotter's natural orientation is portrait, it might be necessary to rotate the plot 270 degrees to achieve the result you want. See Scale, Rotation, and Origin for more information about rotating a plot.
Inches. Specifies inches for the plotting units.
MM. Specifies millimeters for the plotting units.
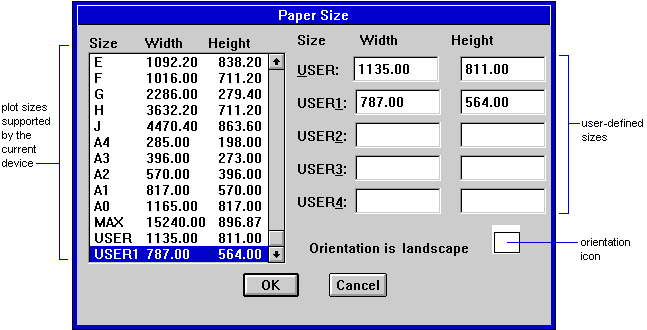
Size. Displays the Paper Size dialog box.
AutoCAD LT lists the plot sizes the current plotter supports. MAX is the maximum size that the plotter can handle; it might be larger than any of the standard sizes displayed.
Select a predefined size or enter the width and height in a USER text box.
Scale, Rotation, and Origin
Sets the plot scale, rotation, and origin. The label Plotted Inches = Drawing Units reflects the units previously chosen for paper size (millimeters or inches). When millimeters are chosen, the label reads Plotted MM. = Drawing Units.
You cannot plot a perspective view at a specific scale. Select Scaled to Fit and use the paper size to control the overall size of the plot.
Rotation and Origin. Displays the Plot Rotation and Origin dialog box.
Plot Rotation. Select a rotation button to rotate the plot clockwise.
Plot Origin. The plot normally begins in the lower-left corner of the paper (the home position). Enter the plot origin in the X Origin and Y Origin boxes to place the plot origin at another location on the paper. On some plotters you can use negative coordinates.
Plotted inches/MM = Drawing Units. To specify an exact scale for the plot, determine the number of drawing units to be plotted per millimeter or inch on the paper. Then enter the number of plotter units in the left text box of the Scale, Rotation, and Origin dialog box and the number of drawing units in the right text box.
When Scaled to Fit is turned off, the text boxes default to 1=1 except when the scale has been previously set to other values. In that case, AutoCAD LT displays that scale in the text boxes. Here are some other examples of what you might enter:
2.5=1 could represent 2.5 millimeters = 1 kilometer
1/4"=1' represents 1/4 inch = 1 foot, when units are in feet and inches
0.25=12 represents the same scale as in the previous example when units are decimal
Scaled to Fit. Scales the plot so that the view chosen, the portion of the drawing to be plotted, is made as large as possible for the specified paper size.
When Scaled to Fit is selected, the text boxes display the actual scale used to fit. AutoCAD LT updates this scale whenever you make any entry that affects the scale.
Plot Preview
Displays the plot on the screen so that you can check that it's correctly placed on the paper.
Partial. Quickly shows an accurate representation of the effective plot area relative to the paper size. Partial preview also gives advance notice of any warnings that you might encounter when AutoCAD LT plots. The final location of the effective area on the paper depends on the plotter.
After selecting Partial, choose Preview.
When you define a positive or negative origin in the Plot Rotation and Origin dialog box, AutoCAD LT offsets the device origin from the lower-left corner. If you offset the origin so much that the effective area extends outside the graphic area of the preview area, AutoCAD LT displays a blue line along any clipped side.
The Rotation icon represents the origin of the drawing. When rotation is set to 0 (the default), it shows in the lower-left corner; 90 degrees in the upper left; 180 degrees in the upper right; and 270 degrees in the lower right. This icon indicates the orientation of the drawing as defined by the rotation setting.
Full. Displays the drawing on the screen as it will appear when plotted on paper.
After selecting Full, choose Preview.
AutoCAD LT displays the preview and the cursor changes to a magnifying glass with plus (+) and minus (-) signs. Dragging the cursor toward the top of the screen enlarges the preview image. Dragging toward the bottom of the screen reduces the preview image.

Right-click to access a shortcut menu offering additional preview options. You can also access Full Preview directly using the PREVIEW command.

![]()
Assignment: Exercise 3, due at beginning of class, Week 7