| |||||||
|
|
|||||||
|
Your Arch 610 For this assignment, you will edit your index page and customize your first project page with 3 or more images from a previous homework assignment. Plan how to format graphics for the small screen considering the following:
|
|||||||
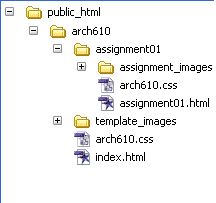
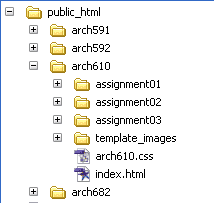
PART I: Download, Text Format, Link, Upload1. Download the student web page template : [student_template.zip]. Uncompress these files into a student_template folder by double clicking. Older computers may require ZipCentral on Microsoft Windows or Stuffit Lite on Macs utilities are available on the Duckware CD-ROM from the Computing Center. 2. Customize the index.html page. The web page template folder has an organization you will use to organize projects. Inside the Arch610 directory (folder), there is a subdirectory or folder named “template_images”. Keep image files pertaining to your index.html file in this folder. Your projects should be in individual assignment folders. The individual assignment folders will contain your assignment html file and assignment images. Keep your assignment image files within the correct “assignment_images” folder. a. Add an image. Start by placing a digital image JPG or GIF for your homepage in the first "template_images" directory. Opening up the index.html file, use Adobe GoLive to insert this image into your homepage by clicking on the large grey box and drag an image filename from the site window. b. Edit the text. Type over the dummy text to give your name c. Create a link. Type "Visit My Blog", highlight the text and click on the chain button in the Inspector Palette. Type the URL of your Blogger.com site: http://title.blogspot.com. You can also type in a phrase at the bottom of the page that reads, "go back to Arch610 class page", then highlight it and create a link to <http://www.uoregon.edu/~graphics>. 3. Upload the template into your own remote network account on UOREGON. When you sign up for e-mail, you are assigned file space on the UOREGON shell server that can be used for webpages. Using GoLive, enter your e-mail password and user name to establish an ftp-connection and then upload the web page template. Once you are connected to the server, create a folder called "public_html" if you do not have one already created. You will put all your webfiles in this folder only. File Structure http://www.uoregon.edu/~jsmith/arch610 After you have developed 2 additional assignments and other course web pages, your public_html folder could look more like the image below right. Your course webpage will be accessible from:
Later, you can create a cover for your overall UOREGON homepage, a "public_html/index.html" file, which masks the contents of your public_html directory, and should contain a link to your public_html/arch610/index.html page. This overall cover page will cover the directory visible from : http://www.uoregon.edu/~login/ PART II: Virtual Museum Example4. Edit the assignment 01.html to present a previous Arch 610 assignment. Using Plan where images could go using the assignment01.html table format. Write about 300 words to describe your project. 5. Prepare images. If necessary, resize and correct the image format. Using Photoshop's, "Save for Web" command, save the image as a JPEG or GIF file. (File type descriptions.) Copy the files to the assignment01/assignment_ images subdirectory. 6. Insert the images onto your web page. Using GoLive, highlight a gray box on the assignment01.html page and browse to select an image from your assignment_images folder. release it where you want it to appear in the page layout. You might have to delete extra gray box placeholders. 7. Upload the new files. Using GoLive, upload your assignment01.html file and image file into your network space, in the correct location. 8. View the new pages. Using your browser, type in your own URL and click through the pages to see what your new website looks like, and to make sure the links are all correct. If you cannot view the web page using your browser, you probably have not completed each of the steps correctly. 9. Send an e-mail to your GTF telling how it went and listing your web address. |
|||||||
|
FOR THE ADVANCED
REFERENCES Downloading and saving "Student Template": Unzipping the template files: Getting started: Editing your homepage: Editing your assignment pages: Uploading your student templates: Expanding your website with new assignments Entire Tutorial A List Apart Primer - lays out the territory of web design with links to key essays EVALUATION CRITERIA Concept (~2 points)
Design Quality (~2 points)
Technical Competence (~3 points)
Completeness (multiplier factor 0 to 100%)
|
|||||||
|
|
|||||||


 website will contain a summary of your computer graphics work for the term with at least 9 pages. As curator, you will choose a selection of work from your assignments or other digital design projects to demonstrate your ability with 3D modeling & rendering, image processing and illustration software.

