Digital
Copystand Photography
The VRC
has a secure, fully equipped photography studio for shooting large-format, 3D
or fragile materials. The workflow is slightly different than scanning either
slides or printed material in that our digital camera outputs RAW files that
need to be saved as TIFs. Set up takes considerably more time, as does the
actual shooting of the object. Thus, we only use the copystand when necessary
during our regular workflow or for special projects. At least one Scanning
Technician a year is trained to use the digital camera. Only Staff have access
to the studio and the equipment cabinets. The PC in the photography studio is
regularly calibrated to ensure color fidelity.
| |
1.
CAMERA: Canon EOS 5D, 24-105mm f/4L
or 50mm f/2.5 Macro lens, 4GB CompactFlash card, Remote Switch, Rechargeable
Lithium-Ion Battery, Right Angle Finder.
2.
COPYSTAND: Bogen/Manfrotto Super Repro
Copy Stand FF1723, 4 Smith-Victor Open Face lights.
3.
ACCESSORIES: Backdrop, foam supports,
snakes, etc.
1.
Insert the battery into the camera
(bottom right) and turn it on
2.
Set the camera to Manual exposure (top left wheel)
3.
Set the camera to raw mode (Menu button > Quality > RAW)
4.
Set the white balance to tungsten (AF-WB button > Tungsten)
5.
Set the iso to 100 (DRIVE-ISO
button > 100)
a.
If you feel
the need to bracket, do so using the shutter speed, not the aperture, to ensure
consistent depth of field (dial behind the shutter button)
6.
Mount either the 50mm macro lens or
the 24-105mm zoom lens
a.
Many macro
lenses have too long of a focal length to effectively shoot large subjects
7.
Set the aperture (wheel on back of
camera) to halfway between the minimum and maximum aperture for the lens,
i.e. f/16 for an f/2-f/32 lens, for the sharpest results
8.
Mount the camera parallel with the
copy board. There is a small level in the cabinet you can use to assist mounting
the camera
9.
Attach the cable release (left side
of camera) and possibly the Right Angle Finder if you are shooting large subjects
with the zoom lens
10. Check the eyepiece for focus and adjust
the diopter if necessary
11. Ensure that all four hot lights are
pointed at 45 degree angles to the copy board
12. Place the appropriate background on
the copy board (white matte board, black velvet, etc.)
13. Apply suggested skin protection (seriously—the
lights are HOT!)
1.
You may use the automatic white balance
(see B. 4, above) or custom set the white balance for greater color accuracy.
If you choose to set it manually, you should do so every time you start a
new shoot. We occasionally let others use the equipment for AAA materials
and they could change the settings
2.
Mount the Macro lens and set it to
manual focus
3.
Focus on a white object (or 18% gray
card) and shoot for standard exposure
4.
Press the Menu button on the back and
navigate to the Utility menu
5.
Use the wheel on back to select Custom
WB
6.
Press set
7.
Use the back wheel to select the picture you just took
8.
Press set
9.
Press the AF-WB button
10. Use wheel on the back to select Custom
1.
It is helpful to have two people doing
the copy work, one operating the camera, and the other turning pages/getting
the next object ready for the camera and rehousing the last one.
2.
Turn on the copystand lights
a.
The lights are very hot. Avoid leaving
the subject under the lights for long periods of time. Use the older lights
to set up and frame the object, then turn on the new lights and check for
shadows before shooting the test frames. Turn off the new lights between setups.
You may have the fan running if it does not interfere with the subject
3.
Close the door to the studio and douse
the overhead lights
4.
Set the subject on the board and frame
it tightly, leaving only ½” or so around the object, while using the longest
focal length possible: Move the
mast of the copy stand as high as you can and zoom in to increase the focal
length and prevent softness or vignetting
a.
It is easiest to rotate the actual
artifact so that it will be oriented correctly in the cameras viewfinder (upside
down on a copy stand)
5.
Stand back from the copystand to prevent
throwing shadows when shooting
6.
Autofocus shooting
a.
Set the switch on the lens to AF
b.
Push halfway down on the cable release
to autofocus, then push further to release
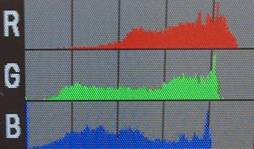
c. Take a few test frames and look at
the histogram. To determine the
best exposure the histogram information should not bleed off either end of
the graph
d. Shoot a three or four frame burst for
each object to ensure a sharp image
7.
Manual focus shooting
a.
Shoot with
manual focus only if you cannot get the autofocus to work. It may be that
you will have to look closely at the RAW files on the computer to determine
if the picture needs to be reshot using manual focus
b.
Set the switch
on the lens to MF
c.
Use the focus
ring on the lens to focus on the object as best you can
i.
Be very careful not to move the body
of the camera!
d.
Push halfway
down on the cable release to see focus points through the eyepiece (red dots.)
The more red dots the better
e.
Stand back
from the copystand and release the shutter
f.
Take a few
test frames and look at the histogram. To determine the best exposure the
histogram information should not bleed off either end of the graph
g.
Shoot a three
or four frame burst
h.
Move the focus
ring one way very slightly and shoot several more images. Repeat going the
other way with the focus. Hopefully one of the sets will be perfect!
1.
The goal is
to model the subject using a smooth gradation of light rather than hard, even
light that flattens the subject.
2.
Move the subject
as far forward from the background as you can
3.
Use one light
at 45 degrees from above (key light) and another bounced or reflected towards
the subject to remove shadows (fill light)
1.
Examine and
import photos
a.
All required
equipment and software is available in the studio and on the studio PC. Examination
of the photos should be done with the overhead fluorescent lights OFF. The
desk lamp next to the PC may be used for light. Make sure the light from the
lamp is not shining directly on the monitor, as this will effect your perception
of colors on the screen.
b.
Open Photoshop
and Bridge
c.
Hook up the
camera or compact flash card reader to the computer (USB devices)
d.
In Bridge,
select the card/camera under My Computer
e. The
photos will appear as thumbnails with a .CR2 file extension. Single-click
on an image to select
i.
Thumbnails
can be enlarged using the slider at the bottom of the window
f.
Inspect the
image for critical sharpness, using the Preview pane. Single click an image
to get the magnifier window
g.
Assign a 5
star rating to good images (Shift+Ctrl+5)
h.
Sort by ratings,
then select the 5 star images, right click and choose “Copy to directory”
i.
Choose the
“Camera RAW” folder on the desktop and save the images to it
2.
Editing
a.
Open several
images in Photoshop
i.
The images
will not open directly in Photoshop, but instead in a RAW Editor window
ii.
Use the RAW
Editor to adjust the following, as necessary:
A.
Temperature:
remove color casts and change the hue of the whole image
1.
ALL color
correction should be done in the RAW Editor, if possible. Multiple images
shot under the same light and in the same location can be adjusted as a group
2.
Normal daylight
5200K, tungsten 3200-3400K. You may want to jot down the settings you are
using if you work on multiple batches
B.
Exposure:
change the brightness
1.
White will
rarely be true white: don’t overexpose and push information out (check the
histogram)
C.
Blacks: change
the contrast
1.
Backs can
get blacker. Push information out a bit to cover up inconsistencies in the
blacks. It will be very noticeable when you’ve gone too far in either direction
(check the histogram)
D.
Straighten
1.
Choose the
Straighten tool. Pick a straight line on the image and draw a line to follow
it
2.
Image will
automatically rotate and activate the Crop tool
E.
Crop
1.
Choose the
Crop tool and rotate the selection to straighten
2.
Once the crop
box is set, the image will appear cropped once it is opened in Photoshop
iii.
After all
adjustments, choose the best images to open in Photoshop (Crtl+Click each)
iv.
Click the
Open Images button
A.
Do not open
more that 10 images at a time, less if possible, or you may run short of memory
and crash the system
v.
Edit the images
further in Photoshop and save as uncompressed TIF files. See Post-scanning
Adjustments
vi.
Attach metadata,
create JPG derivatives, and upload all images to the server
·
Bad : all the information is on one side of the graph
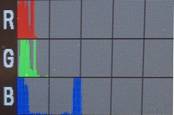
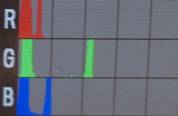
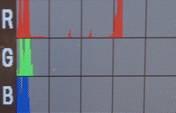
·
Good : the information is centrally distributed