
Digital Electronics
PHYS 432 - Arduino IDE
Updated Thursday May 20, 2021Introduction
This page is a brief outline of how to get started with programming an Arduino microprocessor through the Arduino Integrated Development Environment (IDE). These instructions are specifically written for the Arduino Nano board using the ATmega328 microprocessor, but a very similar process should work for all Arduino boards.
This page is not an introduction to the Arduino in general, or how to write programs for an Arduino. For more detailed information about the Arduino family of microprocessor boards can be found at arduino.cc. In particular, there is a good set of tutorials for specific projects available on the tutorials page, and there are a wide number of other getting started and tutorials available online.
Requirements
You will need a few things to be able to complete this introduction.
- An Arduino Nano or clone.
- A computer.
- A USB cable to connect the Nano to your computer. In the labkits I have provided a short mini-USB to USB-A cable. If your computer does not have a USB-A port, you will need an adapter, or you could buy a dedicated cable that works for your machine.
- The Arduino IDE. This can be downloaded and installed on your machine, or it can be run as a web service. Both can be found on the downloads page. I have never used the web service, and it requires an account, but I am sure it works well.
There is a similar set of instructions from Arduino available here.
First Sketch
Once you have the Arduino IDE, you want to start a new project, which in Arduino parlance is called a sketch. The traditional first sketch will blink the LED on the Arduino board. It is actually important to make sure that your development environment and connection to your board is working before proceeding, as being able to download something to your board and see it work is an important test before moving on to anything more complicated.
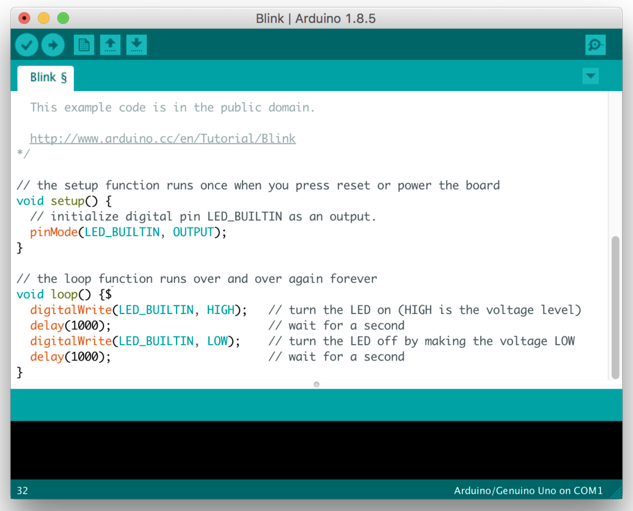
To start your first sketch, open the Arduino IDE and either select the sketch under "File : Examples : Basic : Blink", download the file here, or just copy/paste the following into your IDE editor.
/*
  Blink

  Turns an LED on for one second, then off for one second, repeatedly.

  Most Arduinos have an on-board LED you can control. On the UNO, MEGA and ZERO
  it is attached to digital pin 13, on MKR1000 on pin 6. LED_BUILTIN is set to
  the correct LED pin independent of which board is used.
  If you want to know what pin the on-board LED is connected to on your Arduino
  model, check the Technical Specs of your board at:
  https://www.arduino.cc/en/Main/Products

  modified 8 May 2014
  by Scott Fitzgerald
  modified 2 Sep 2016
  by Arturo Guadalupi
  modified 8 Sep 2016
  by Colby Newman

  This example code is in the public domain.

  http://www.arduino.cc/en/Tutorial/Blink
*/

// the setup function runs once when you press reset or power the board
void setup() {
  // initialize digital pin LED_BUILTIN as an output.
  pinMode(LED_BUILTIN, OUTPUT);
}

// the loop function runs over and over again forever
void loop() {
  digitalWrite(LED_BUILTIN, HIGH);   // turn the LED on (HIGH is the voltage level)
  delay(1000);                       // wait for a second
  digitalWrite(LED_BUILTIN, LOW);    // turn the LED off by making the voltage LOW
  delay(1000);                       // wait for a second
}
Note that by default, Arduino sketches are saved into a bit of an arcane place. You may want to use "File : Save As..." to put your sketch somewhere that you can find it, although the IDE has a handy "File : Open Recent" directory, so recent sketches can be found quickly.
Compiling and Uploading
Plug your Arduino into your computer using the USB cable. One of the LEDs on the board (labelled Power) should turn on, and after a moment the LED next to it should start blinking. Note that you don't need your Arduino to be in a breadboard (in fact I would recommend against this at the moment) and for this sketch we don't need any external devices attached. Because the pins are conducting, I would avoid setting your board on a metal table, but aside from that, you should be fine. I typically just leave it floating in the air on the end of the short USB cable plugged into my laptop.
You should first compile the sketch and check for errors. First select the appropriate board under "Tools : Board" (you will only need to do this once). We are using the Arduino Nano. Then you can compile the sketch by pressing the left button in the sketch toolbar. This has a check mark icon and says "Verify", but it really compiles the sketch. You actually don't need the board connected, but you will need to select the board first. Check for any errors in the console output at the bottom of the sketch. If anything shows up in red, this is an error, and you need to fix this before continuing. This first sketch shouldn't have any errors, but once you start making changes (and you should!) you may make some mistakes. If you have ever written C or C++, you shouldn't have any problems. If you are only familiar with python, the syntax here is very similar, but spacing doesn't matter, but you do need to terminate every command with a semi-colon. Note that the console also prints out some useful information about how much program memory and dynamic memory your sketch is using. As the dynamic memory is only 2k, this can run out fast.
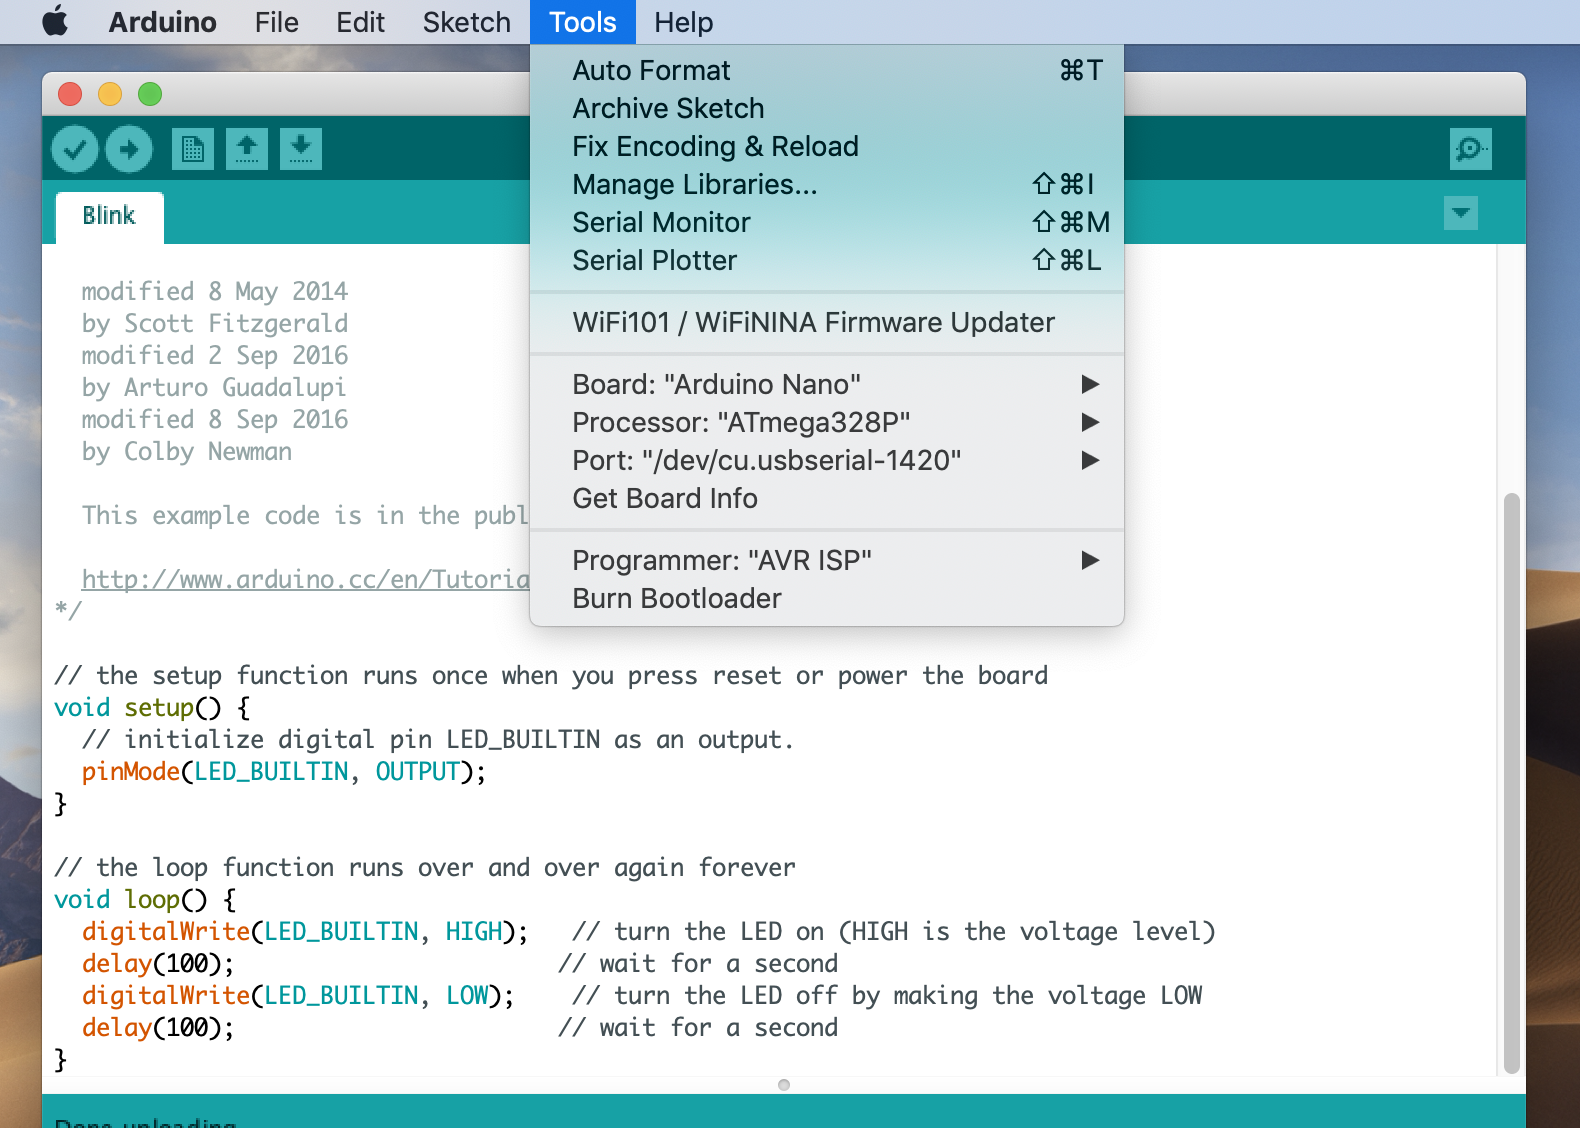
To upload the compiled sketch to the board, you need to find the board on the system and pick a bootloader. Under "Tools : Processor" select ATmega328P. This seems to work with almost all boards I have purchased, although occasionally you get a board with the older bootloader. If you get download errors, try switching to the ATmega328P (Old Bootloader)item instead. One of these two should work. In addition, you need to find the serial connection to the board. Under "Tools : Port" there should be an entry for your Arduino. It may have a funny name (on my Mac it is something like /dev/usb.serial-1420, on Windows it will be something like COM1). Every time you remove and plug back in your board, it will get a different USB-serial connection, so you will likely need to select this every time you start a new session. If there is more than one choice, just pick one to try, and if it doesn't work, switch to the other one.
With those two parameters selected, you now should be able to upload your compiled sketch to the board. Press the "Upload" button in the toolbar (looks like an arrow) and check the console output carefully. If anything red shows up, this didn't work. If it didn't work, first try a different port. If that doesn't work, switch to the other ATmega328P bootloader. The upload command will also recompile your sketch if there were any changes, so you can really just always push the upload button to try again. If there were no errors, the Arduino Nano should now be running your sketch.
If you can't find anything that looks like a serial port, or the Port menu item is greyed out, it is likely that your computer doesn't have a driver for the CH340 USB interface chip used on these Arduino clones. This problem is more common on older operating systems. More recent operating systems should have the driver installed by default, but not always. There are a number of sites with instructions for how to install the driver, but one that I trust (and also has a video) can be found at Sparkfun: How to install CH340 Drivers.
Verification
It is very easy to fool yourself with embedded systems and microprocessors. In particular, the Arduino Nano comes shipped with the same Blink program that you just uploaded, so it is impossible to tell whether your program is really running or not. To make sure, you change the blink duration by changing the argument of the delay functions.
  digitalWrite(LED_BUILTIN, HIGH);   // turn the LED on (HIGH is the voltage level)
  delay(1000);                       // wait for a second
  digitalWrite(LED_BUILTIN, LOW);    // turn the LED off by making the voltage LOW
  delay(1000);                       // wait for a second
The first digitalWrite line turns on the LED, while the second turns it off. The delay functions specify a delay (in milliseconds) so by default this will be on for one second and off for one second. Change the numbers to something like 500 to make the LED blink faster. Compile and upload the sketch and verify that the LED is now blinking faster. Everything within the loop() block is continuously executed by the microprocessor, but you can add anything you want to this loop() block and it will be executed. So for example, you could copy/paste this write HI/delay/write LO/delay sequence multiple times, use different delays each time, and make some funky flashing patterns.
If this works, congratulations! You have verified that you can now talk to your board and upload a sketch. You should always make sure some simple code like this works for any new board you get, as occasionally boards will be DOA.
Note: the only way to turn your Arduino off is to disconnect it from the USB port. It is perfectly safe to do this at any time. Once programmed, the Arduino program memory will store the last uploaded sketch, and will run the same sketch when powered up again.
Troubleshooting
If you have errors in the compilation step, check your code carefully. This has nothing to do with the board itself, and will almost always be some syntax error in your code. Alternately you may have run out of memory, which may happen with more complicated sketches, or extensive use of strings.
If you have errors in the upload step, the most likely culprits are selecting the wrong processor, or not having the correct port. If changing these settings doesn't work, you may have a bad board. Find some help, as debugging this further is probably beyond your current skill set. If you end up in a situation where a working board no longer wants to be programmed, or the program seems to have hung, you can press and hold the button on the Nano board for a few seconds to force a reset. I have rarely had to resort to this, but I have occasionally needed to do this.
Next Steps
There are many online resources and getting started guides for the Arduino. The Arduino site itself has some limited information on its Foundations page. One useful link on that page goes to the Language Reference that describes the syntax and built-in functions available in the Arduino Programming Language. A wide variety of commonly used libraries are also shown on the Libraries page.
If you are ready to move on to our Lab tasks, start with Task 1.
|
|
Copyright © MMXX, Eric Torrence, All Rights Reserved |